Unplug from electrical socket and let machine cool down 100%.
Set the pump pressure somewhere between 9-10 bars.- if not already.
To determine the OEM flow rate of your machine BEFORE installing the flow device - run the water for 10-20 seconds and measure how many milliliters or grams of water come out per second.
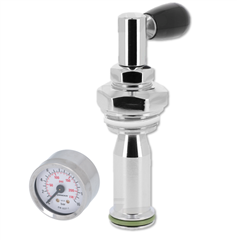
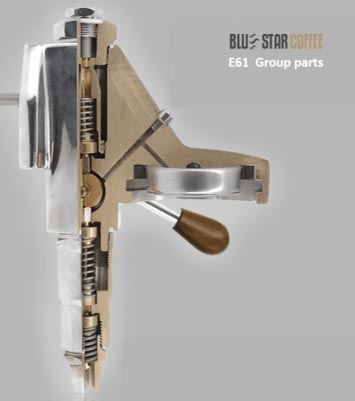
Installing the pressure gauge.
Without touching the face/glass, wrap the white Teflon tape (included with kit ) on the threads of the manometer to ensure a proper seal.
Rotating clockwise, and without touching the face/glass, finger-tighten (using tools could cause irreparable damage) the manometer onto the grouphead. Tighten until you feel resistance, and make sure the front of the gauge is facing correctly. You dont have to screw the manometer all the way to the end of the thread.
Use a blind basket to test for any air/water leaks. Don't stand close to the machine when testing. If leaks are present, tighten either the FCD or manometer.
1. After installing the flow device, you can determine various flow rates at different angles/points. Completely open or close either handle at the 12, 9, 6, or 3 oclock position. In these instructions, we will be turning counter-clockwise.
2. At the 12 oclock position there will be no water flow. 9 o clock = 2-3 mL/sec. 6 oclock = 4-6 mL/sec. 3 oclock = 7 mL/sec, and so on.
The FCD is directly connected to the grouphead and will therefore become extremely hot, so when turning the FCD handles, be careful so as not to burn yourself. The handles themselves are made of a special heat-resistant plastic.
4. Now you can decide whether you want to create a pressure-only profile (manometer only), or whether you want to introduce flow rate into the mix. We recommend experimenting with a variety of different settings to find your perfect espresso.
.Make sure you dont have worn-out gaskets, springs, scale build-up in your grouphead, etc. Taking proper care of your machine will guarantee the FCD functions properly and efficiently.
Over its lifetime the FCD will not work at its optimum as gaskets and springs can wear and a build up of scale can obstruct needle.
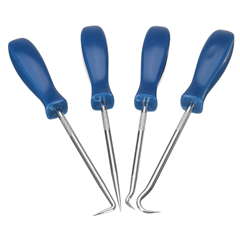
Tools:
Teflon tape - Included
Electrical tape - to protect the chrome nut
5mm Allen key for gauge installation.
12” x 1.5'' adjustable wrench - to remove chrome nut


 Galway, Ireland